

一、 DS1302 即時時鐘模組 (RTC) 運作原理
DS1302 是 Arduino 實作電子時鐘、定時開關與資料記錄器(Data Logger)常用的 RTC(Real-Time Clock,即時時鐘)晶片。
模組核心特色
-
獨立計時能力: 內建計時器可計算秒、分、時、日、月、星期與年份,並自動處理閏年修正(計算至 2100 年)。
-
雙電源供電設計: 板載 CR2032 鈕扣電池座,當 Arduino 主板斷電或拔除 USB 時,備用電池會繼續維繫 RTC 晶片運作,確保時間不會重置。
-
三線式 SPI 溝通: 使用 CE (RST)、SCLK (CLK) 與 IO (DAT) 三根訊號線與微控制器進行串列通訊,佔用 GPIO 資源少。
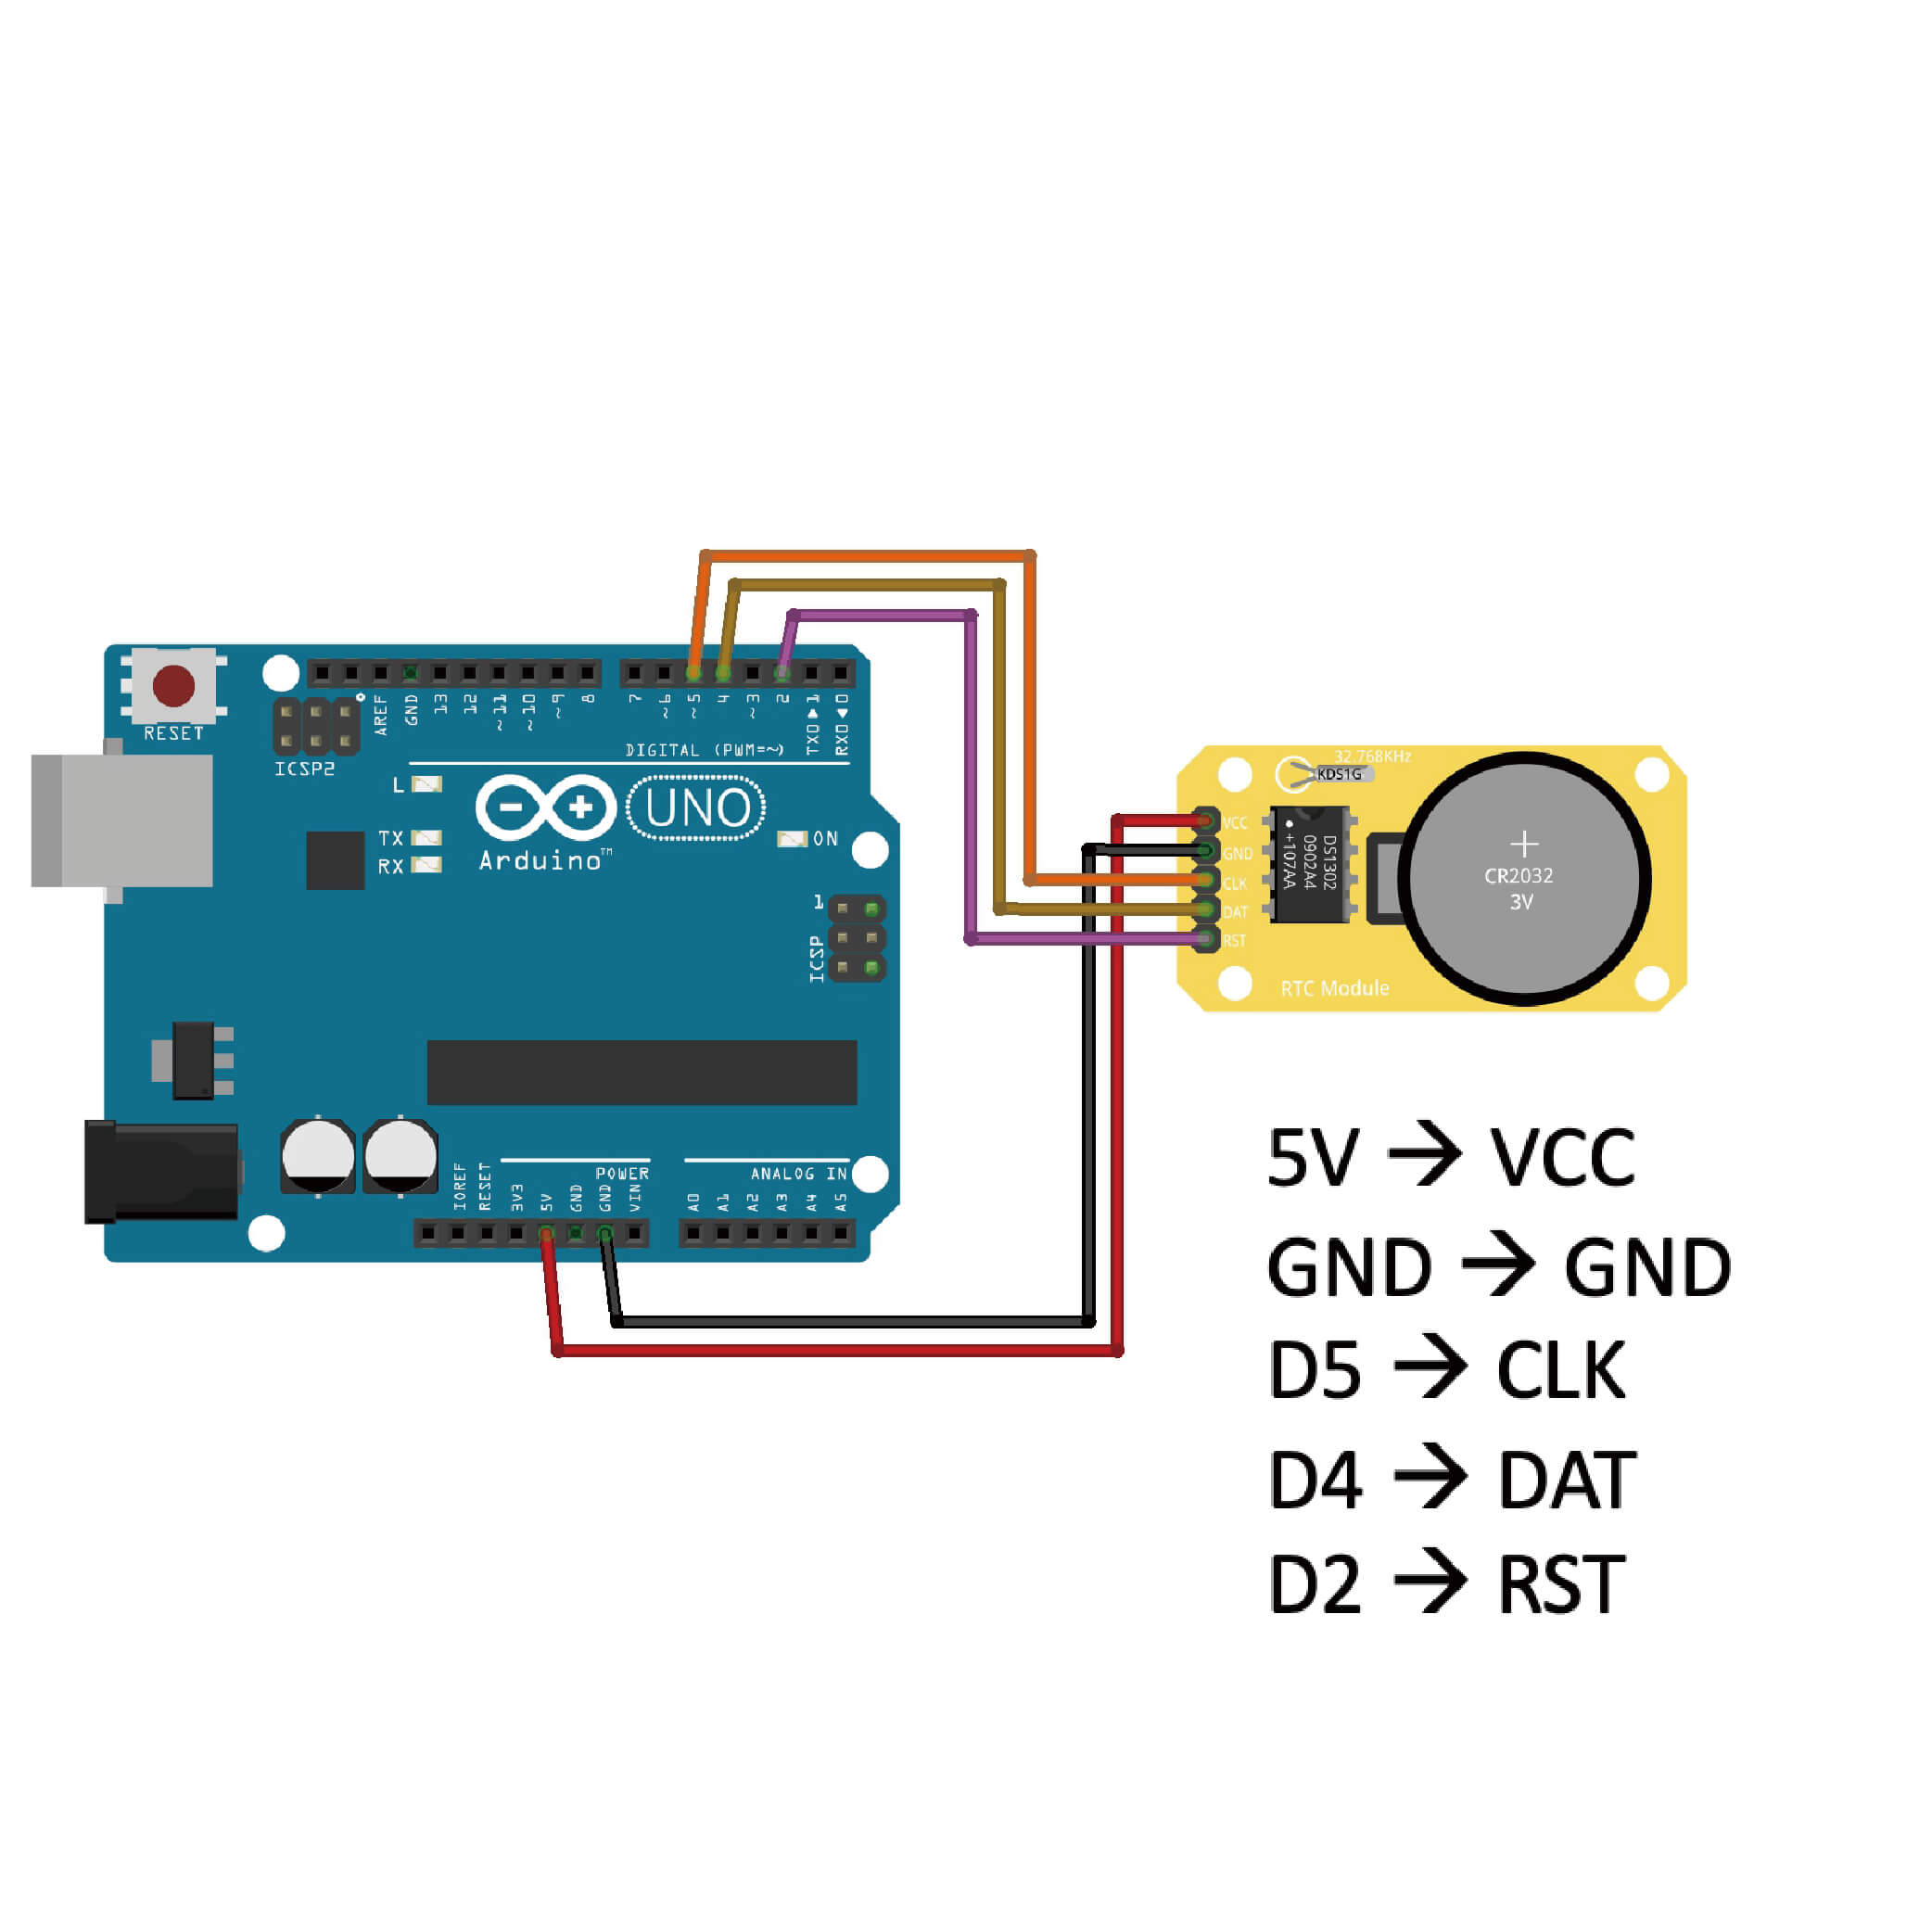
二、 實驗所需材料與電路接線圖 (Hardware Setup)
本實作使用 RtcDS1302 函式庫進行時間自動校正與 Serial 序列埠顯示。
準備材料
-
Arduino Uno 開發板 x 1
-
DS1302 RTC 時鐘模組(含 CR2032 電池) x 1
-
杜邦線
準備好你的硬體工具了嗎? 推薦選購:米羅科技 – Arduino 程式學習爆款套件組(包含豐富驅動專案模組)
腳位對接說明 (Pin Mapping)
三、 安裝 DS1302 程式庫與完整程式碼實作
在編譯程式前,需先安裝對應的 DS1302 程式庫。
安裝 DS1302 程式庫步驟
-
開啟 Arduino IDE 軟體
-
點選頂部選單的 「草稿碼 (Sketch)」 「匯入程式庫 (Include Library)」 「管理程式庫 (Manage Libraries…)」
-
在右上方搜尋框輸入「DS1302」,下方會列出所有符合條件的程式庫,找到
RTC by Makuna程式庫後,點選 「安裝 (Install)」 完成匯入。

完整程式碼
程式燒錄後,會自動比對電腦編譯時間與 DS1302 內部的時間;若編譯時間較新,則會自動將當前時間寫入晶片。
#include <RtcDS1302.h>

ThreeWire myWire(4,5,2); // IO, SCLK, CE
RtcDS1302 <ThreeWire> Rtc(myWire);

void setup ()
{
    Serial.begin(9600);

    Serial.print("compiled: ");
    Serial.print(__DATE__);
    Serial.println(__TIME__);

    Rtc.Begin();

    //compiled變數設為電腦的程式碼編譯時的日期和時間
    RtcDateTime compiled = RtcDateTime(__DATE__, __TIME__); //
    printDateTime(compiled);
    Serial.println();

    //判斷DS1302是否接好
    if (!Rtc.IsDateTimeValid())
    {
        // Common Causes:
        //    1) first time you ran and the device wasn't running yet
        //    2) the battery on the device is low or even missing

        Serial.println("RTC lost confidence in the DateTime!");
        Rtc.SetDateTime(compiled);
    }

    if (Rtc.GetIsWriteProtected())
    {
        Serial.println("RTC was write protected, enabling writing now");
        Rtc.SetIsWriteProtected(false);
    }

    if (!Rtc.GetIsRunning())
    {
        Serial.println("RTC was not actively running, starting now");
        Rtc.SetIsRunning(true);
    }
    /*如果程式編譯當時的時間與DS1302上的時間不同,
     *將比較DS1302上紀綠的時間和編譯時的時間哪個比較新,
     *若編譯時間比較新,則將DS1302模組內存的時間更改成編譯的時間
     */
    //now:DS1302模組內存紀綠的時間,compiled:編譯時的時間
    RtcDateTime now = Rtc.GetDateTime();
    //編譯時間比較新,把DS1302模組內存的時間更改成編譯的時間
    if (now < compiled) { Serial.println("RTC is older than compile time! (Updating DateTime)"); Rtc.SetDateTime(compiled); } else if (now > compiled)
    {
        Serial.println("RTC is newer than compile time. (this is expected)");
    }
    else if (now == compiled)
    {
        Serial.println("RTC is the same as compile time! (not expected but all is fine)");
    }
}

void loop ()
{
    RtcDateTime now = Rtc.GetDateTime();

    printDateTime(now);
    Serial.println();

    if (!now.IsValid())
    {
        // Common Causes:
        //    1) the battery on the device is low or even missing and the power line was disconnected
        Serial.println("RTC lost confidence in the DateTime!");
    }

    delay(10000); // ten seconds
}

#define countof(a) (sizeof(a) / sizeof(a[0]))

void printDateTime(const RtcDateTime& dt)
{
    char datestring[20];

    snprintf_P(datestring,
            countof(datestring),
            PSTR("%02u/%02u/%04u %02u:%02u:%02u"),
            dt.Month(),
            dt.Day(),
            dt.Year(),
            dt.Hour(),
            dt.Minute(),
            dt.Second() );
    Serial.print(datestring);
}
Serial 序列埠監測顯示結果:

四、 常見問題與除錯 (FAQ)
Q1:出現 “RTC lost confidence in the DateTime!” 警告訊息是什麼原因?
解答:
首次通電: 模組剛接到 Arduino 時晶片尚未啟動計時,屬於正常現象,程式會自動將編譯時間寫入。
電池無電: 模組上的 CR2032 電池電量過低或未裝電池,導致斷電後內部晶片重置失步。
Q2:序列埠監視器顯示的時間沒有每秒更新,而是好幾秒才印一次?
解答: 原始程式中的
loop()函式最後設定了delay(10000);(等候 10 秒),因此每 10 秒才會在序列埠印出一次最新時間。若需每秒更新,可調小 delay 數值。
Q3:序列埠輸出亂碼或無法顯示時間?
解答: 請檢查 IO(D4)、SCLK(D5) 與 CE(D2) 腳位是否接錯,並確認 Serial Monitor 的波特率設定為
9600 baud。
延伸閱讀與推薦課程
-
進階顯示模組控制:
-
類比訊號讀取實作:
-
聲音與頻率控制:
-
上一篇教學:
-
教學總索引: